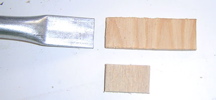
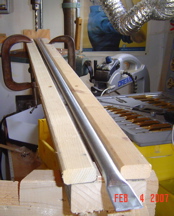
Shims used to work with 1/2" conduit on a 3/4" conduit drilling jig I already have a 3/4" conduit jig, but I need to work with 1/2" EMT to create the 1v struts for the shade structure over the deck. Rather than build another conduit drilling jig, I added some shims to make my 3/4" jig work with 1/2" EMT. The shims are cut from 1/4" plywood and are narrow enough to fit between the 1x2s on the jig. You can see that one shim is about twice as long as the flattened tab at the end of a 1/2" strut, and the other is about as long as the flattened portion. You'll actually need one more shim the same width and perhaps 2" long (it really doesn't matter how long that one is). |
Shims in place Here you can see the placement of the two shims from the picture above. The long one goes on the bottom and the small one goes on top, and both are pushed up against the vertical plywood that limits how far the strut can go on the jig. |
Fasten the first shim Screw down the first jig about 1/2" from the end furthest away from the drill bit. |

Fasten the second shim I nailed the second shim in place with a short nail (about 1" long). You need to be sure that the drill bit won't be anywhere near the nail or screw you use to fasten the second shim. No, the second shim can't be any longer than the tab -- you'll see why shortly. So, you don't have a lot of room to fasten it without getting too close to the edge of the shim or where the drill bit will be drilling. |
Fasten Rear Shim You also need a shim at the opposite end of the conduit drilling jig. It's placement isn't crucial, nor is its length. |
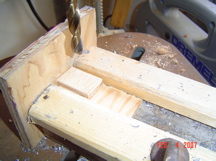
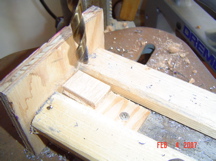
A 1/2" strut in the 3/4" conduit drilling jig with shims Here is a view of the strut in place. The rear shim and the large shim near the drill bit raise the round portion of the strut up so that the flat portions are at the right height for drilling. |
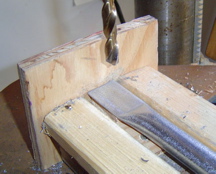
Closeup of the business end of the conduit drilling jig with shims The round part of the conduit sits on the bigger, bottom shim, and the flat portion sits on the short shim. The short shim couldn't be any longer than the flattened tab or else it would bump into the angled transition from the round part of the strut to the flat part. The small shim gives you a flat table to stabilize the strut while it is being drilled. |
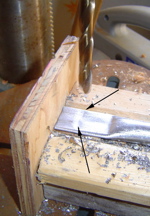
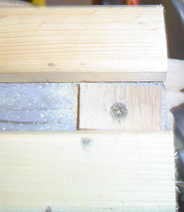
Wrong side to drill If you look carefully where the arrows point in this picture (click it to see a more detailed view) you can see a dent very close to where you would be drilling the hole. Don't drill this side. The bit will wander, possibly even if you have used a center punch. If the bit wanders it will at best drill in the wrong place, and at worst will break the drill bit and possibly hurt you when it goes flying. The next page has a picture of the correct side to drill. |