Fence Repair
07/03/20 16:20
Should I replace or repair my fence?
Most people I talk with who have problems with their redwood fences assume that their fence will need to be replaced. In fact that tends to be true less than half the time in my experience. Often there are parts of a fence that have many more years of useful life in them and repair is a viable and much less expensive option.
About Redwood
This is all about redwood and redwood fences. Redwood has both a pink portion of wood and portions that are variously faded toward white or are entirely white. The color comes in part from the tannin in the wood, or at least the pinker the wood, the more tannin is present. The tannin inhibits bacterial and fungal growth, and repels insects. It “tastes bad” but and has anti-nutritional properties by interfering with the digestion of whatever consumes it.
Here is a photo of a cross-section of construction common redwood 2x6 that was the top lateral on a deck’s railing. It has been weathered on the top. The cracks on top are caused because the wood shrunk more on the top than anywhere else. It shrunk there because it was always in the sun and it dried out more. Also the direction of the grain in this piece would mean it would cup downward. The pith of the rings expand and contracts more than the edges of rings. Fence pickets also cup in the same direction: boards cup away from the center of the tree.
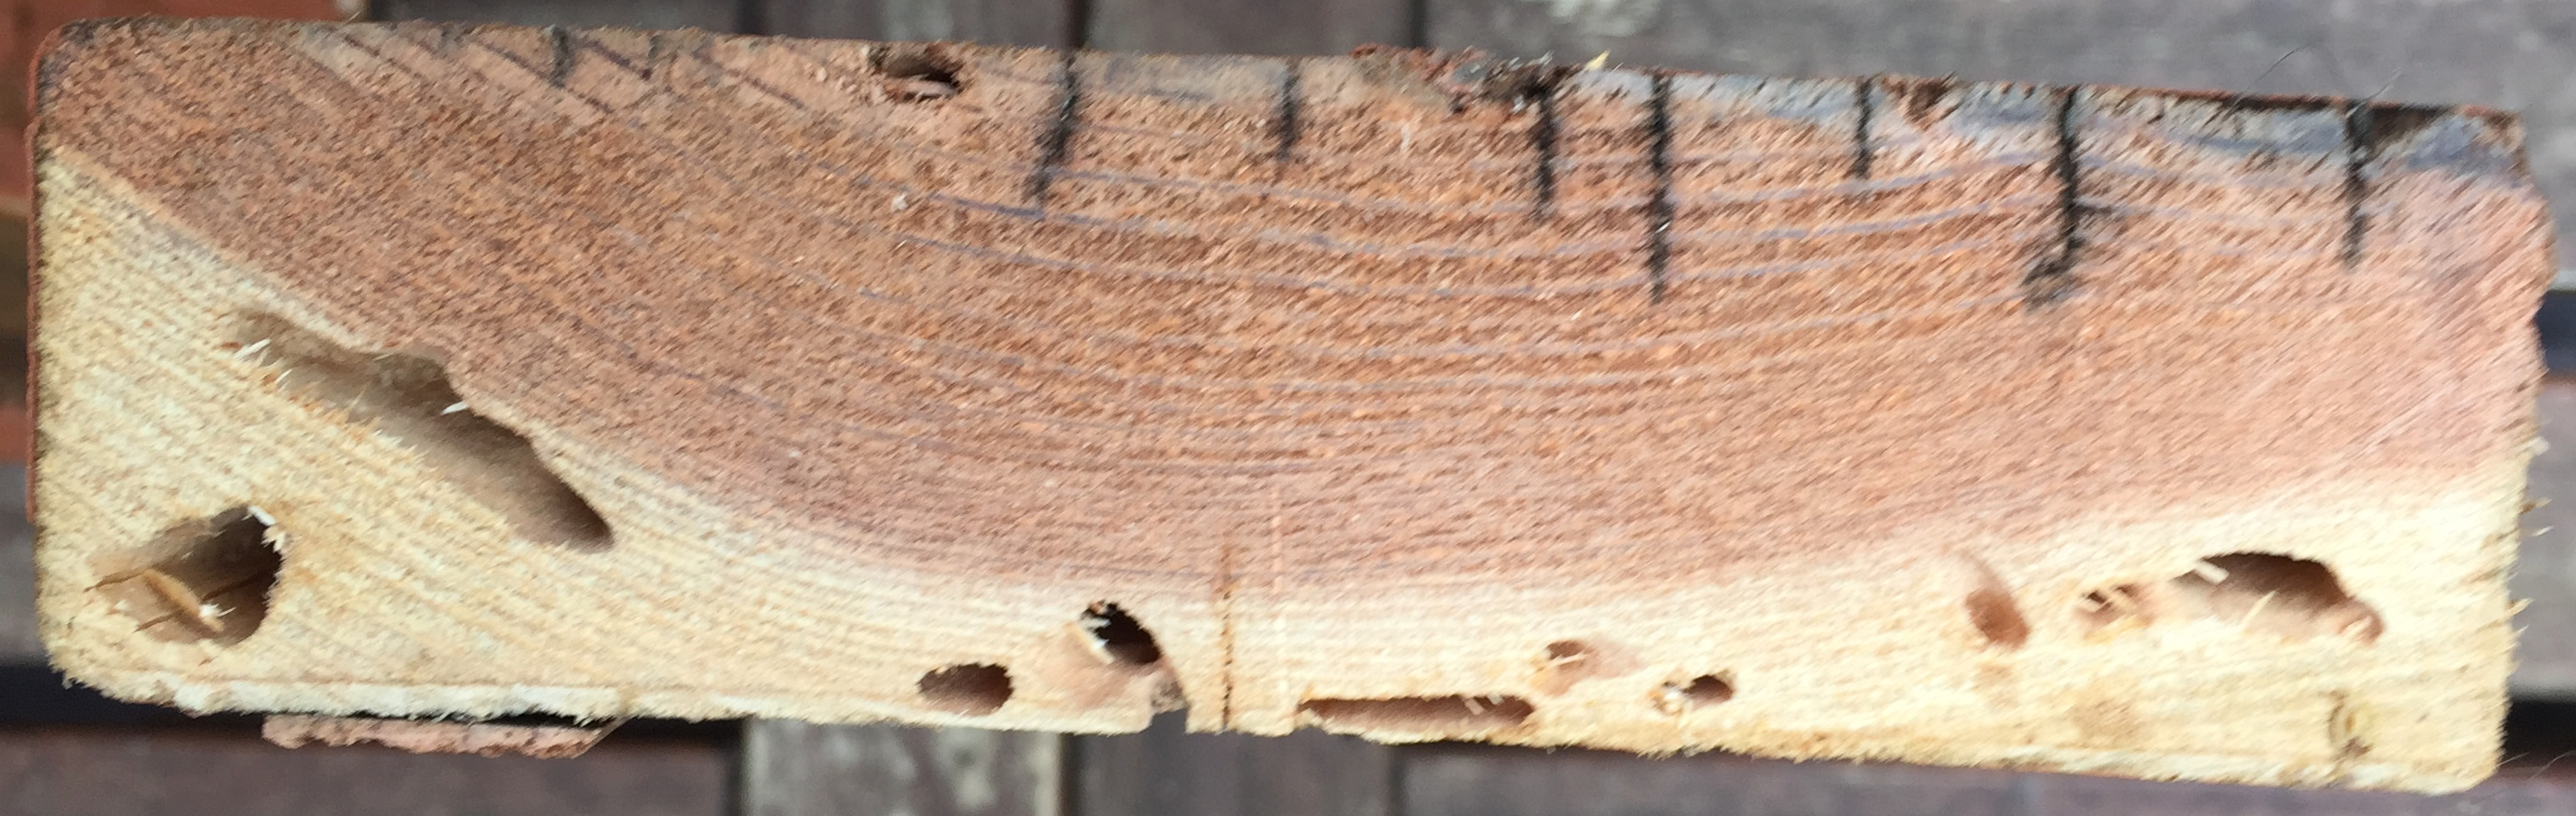
You can see the pink part and the white part of this piece. Redwood doesn’t always change as discretely from pink to white as in this piece. The pink part has a lot more tannin in it than the white part. You can see that termites have eaten the white part and left the pink part almost completely untouched. It looks like they ate right up to the pink part and then carefully avoided it; or, the ones who ate it died.
Had this piece been consistently coated it would have kept the moisture in the wood and it might not have cracked or not as badly, but it would still cup as it dried, so the paint on top would crack too. The cracks let in water and with it microbes and fungus which also try to consume the wood. But you can see they haven’t been very successful. The dark stain around each crack marks the extent of their infiltration into the wood, at best.
This piece was construction common, which includes both pink and white portions of the wood. You can also buy construction heart wood which is not supposed to have any white portion. I used construction heart for the posts and laterals, but I use construction common pickets. I exclude any pickets with more than a small amount of white in them. A little bit is OK especially if it doesn’t go all the way through the picket. Even if it rotted, so long as the fence remains a fence and serves its purpose of providing privacy I think it is OK to use.
You might not know it, but even taking all manufacturing and transportation into account, building with California FSC certified redwood has a net negative effect on atmospheric CO2. All of the carbon in a piece of wood comes from the atmosphere. The roots provide nutrients to enable the process, but practically all the carbon in wood come from the air. The carbon footprint of a fence project can be reduced by using a polyurethane foam for post bases or by reusing existing concrete post bases.
Fence Repair
First, here are the parts of a redwood fence:
1. The posts (usually 4x4s)
2. The laterals that go between and possibly on top of the posts (usually 2x4s)
3. The pickets (aka “fence boards”)
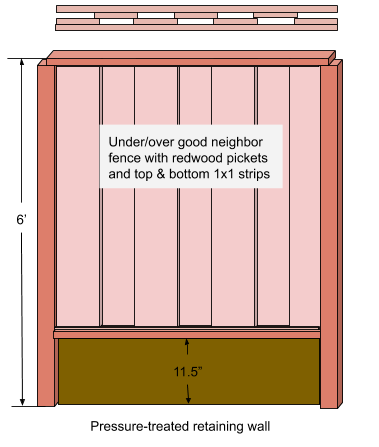
Good Neighbor fences also have horizontal 1x1 strips attached to the laterals covering the ends of the fence boards and physically retaining them. Other designs also have additional horizontal wood pieces, but these aren’t actually structural and their failure would be an aesthetic problem and not one that would lead to the failure of a fence, assuming it was correctly built.
Posts
Posts rot at the ground level if they come into contact with dirt. This is the most common cause of fences failing. They lean or wobble or fall over when the posts fail. Often plants growing on a fence keep the fence up long after it would have fallen without them. Fortunately it is possible to fix rotted posts without replacing the rest of the fence, nor in general damaging the plants on the fence.Here is a detailed article on how to replace fence posts without harming the rest of the fence.
You can make your fence last a lot longer by ensuring that dirt doesn’t come into contact with the bottom of the post, where it reaches the ground. You can dig away the dirt to expose the post, but it may already be rotted. If it is you can spray it with a wood preservative to help arrest the problem, if it isn’t too late.
I will sometimes dig away the dirt and then pour new concrete to form a berm around the post, raising the concrete up above the soil level. Of course over time the soil level may rise because new dirt forms from decomposing leaves, so you’d have to keep the top of the berm visible over time. When I do use concrete I form a berm around the post base when I create it. if I am using polyurethane foam it naturally expands high enough above the soil level that I can cut a berm into post base. The goal is for water to roll away from the post and not sit next to the post. I make an inverted bowl shape.
Laterals
The laterals sometimes rot, especially if plants grow over the fence and drop leaves on them. The leaves fall on the laterals and stay there. They decompose there. They become dirt there. Redwood rots when in contact with dirt. It takes a long time for leaves to become dirt, but in the scale of the life of a fence, it happens pretty quickly - a few years is enough to start the rot process. If the laterals are in the shade that means the dirt won’t dry out and the rot happens faster and sooner. If it is in bright sun that will help slow the rotting process by drying out the dirt. But, it will still rot when it is wet.If I have to replace laterals I will first cut the old lateral out of the fence. I do that by cutting the fasteners with a sawzall and a metal-cutting blade. If there are screws I try to remove them with an impact driver if possible, because screws are made of much harder steel than nails and it damages/uses up the blades much sooner. I cut or remove the fasteners that hold the pickets on first, and then I cut the ones that hold the lateral to the posts second. Since most fences I repair are made with nails, I cut them all. It is impractical to try to remove the nails, and the old pickets may split or break if you try.
Pickets
The pickets fail least often. Aside from physical breaks such as when one gets kicked or broken when someone climbs over, thy only real failure modes are decay, termites and deterioration under daily UV light. A picket in the sun during the day from both sides will not rot, but it will slowly wither away under the UV light. First the outside turns gray but the inside is still pink or red. As time goes on the inside gets less and less red and more and more brown. Tannin is water soluble. Over time as the wood’s water content changes back and forth the tannin leaches out . As it dries it may split, letting in moisture and microbes (fungi and bacteria) and possibly even insects. Over time the tannin goes away and then the wood is vulnerable to rot and termites.
As the pickets age they will break more easily and they will bend or curl more and more. Knots are likely to have fallen out and in general, the pickets stop doing a good job of providing privacy.
Fences I replace are sometimes made of redwood pickets that have lasted 50+ years. But modern pickets probably won’t last that long because they are made from faster growing redwood trees. The growth rings are further apart and the wood is less durable as a result.
If a fence still has good pickets I try to replace the posts and laterals as necessary. But, I don’t replace the pickets unless they are so old that they will not last much longer anyway.
Pickets in good neighbor fences rot at the bottom because water and then dirt collects in the gaps between the 1x1 strips and the pickets. “Least Cost” style fences allow the water to fall off the bottom of the pickets. The pickets should never touch the ground though, or the bottoms will rot.
A Maintainable Fence
Nails suck.
Fences built with nails are difficult to maintain, difficult to repair, difficult to salvage and difficult to extend.
In the 1950s pneumatic nailers became popular and suddenly it was practical to drive a lot of nails quickly and easily. Now it is 70 years later and you can bet any fence still standing that was built with nails was most likely built with a pneumatic nailer. If you don’t see the wood bruised by a hammer around practically every nail then they weren’t hammered in.
People use pneumatic nailers because they are fast and efficient and reliable.
But nails suck. And fences built with nails are more difficult to maintain. When I cut fasteners sometimes pickets break anyway. Had they been screwed together that would not have been a problem.
I suppose there was a time when screws were expensive. The screws I use cost $30 for 5 lbs, which works out to be about a nickel or more each. Nails are still a lot cheaper than screws. But, it is a false economy to save money by using nails if it means the fence cannot be maintained.
What does it mean to maintain a fence? It means replacing boards, laterals or posts that have been broken, rotted prematurely, been discolored or have other defects. If the fence has been screwed together it can be maintained simply by removing the screws and then replacing the wood that has failed. If the fence has been nailed together that process is much harder at best.
Some fences can be built completely using screws - no nails at all. In particular, what I call a “least cost fence”, which is just posts, laterals and pickets on one side of the fence is one of the most maintainable fences that can be made. Also, it is less expensive to create, so some of the money saved can be used for repair in the future.
Some fences cannot be built completely with screws. In particular, the style of good neighbor fence depicted above is partially made with finish nails. The pickets are toe-nailed in at the bottom and top using 2” finish nails. The pickets are retained by 1x1 strips along the top and bottom of both sides. Those strips are often finished nailed in but they can be removed and replaced easily even if they were nailed in. Those strips can also be screwed in if they are pre-drilled and countersunk first. They some times do not survive being removed if they were nailed, so they end up needing new 1x1s for the repair, but 1x1s are inexpensive. Once the 1x1 has been removed individual pickets can be removed and replaced. When all the broken pickets in a section have been replaced a (possibly new) 1x1 is re-attached to finish the repair.
Screws
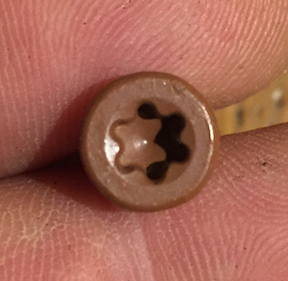
I use ceramic-coated T25 (star-drive) screws. They have a lifetime guarantee. I have used many thousands of these screws. I use hundreds in some fences alone and I make a lot of fences. That is a big lot of screws. Some are sunk once, others are temporary and are sunk and removed several times during the project.
None. Of. Them. Have. Ever. Had. A. Stripped. Head.
If you use Philips head screws, the ones that look like a plus sign, I must humbly ask you to stop doing that unless you hate the people who will have to maintain whatever it is that you are building. Philips head screws strip. The head of the screw gets chewed up and then you can’t get them out. It doesn’t always happen, but it happens a lot. The older the screw the more likely it has corroded and the more likely it will strip. You cannot sink and remove a Phillips head multiple times without it stripping.
There are important differences between the two head designs. A Philips head has interior sides that angle down from the top of the screw toward a point a bit below the top. It means the four corners against which your screw driver pushes are really triangles, not rectangles. You have to push in hard on a Philips head screw while you are trying to get it out otherwise your effort will instead push the screwdriver out of the head, stripping it somewhat in the process. Repeat a few times and that screw will not come out with a driver head ever again.
By comparison a star drive is vastly different. First, the star actually goes straight into the head of the screw. It does not have angled interior sides. So, each facet of the star, against which a facet of the driver bit pushes, is a rectangle, not a triangle. While you do need to maintain some pressure on the bit as it tightens or loosens the screw, you don’t need as much force as you would with a Phillips head screw because there is not much force to push the bit out of the star head.
And, if you’re thinking of using a flat head, please consult this article. And then use star head screws instead.
One or Two Fasteners?
Probably every fence you’ve ever seen had pickets that were attached with two nails. Or, if it was built to be maintainable, two screws. Probably every one of these fences had pickets that are splitting slightly (or a lot) at the top and bottom.
Also, on a related topic, how many fences have you seen where the pickets fell off because the nails or screws failed completely?
Two fasteners is problematic because wood expands and contracts with the relative humidity. Two fasteners trap the wood between them. If the wood is going to expand it will have to push the fasteners apart. If the fasteners won’t move, the wood will be crushed against the fasteners forming a bigger hole next to each fastener. If the wood is going to contract it will pull against the fasteners. If the fasteners won’t move the wood will be crushed against the inside edge or else the wood will split, or both.
Since the relative humidity changes with the weather and season the wood expands and contracts many times over its lifetime by more or less small amounts. Eventually the wood is both cracked and the holes around the fasteners have been enlarged, leading to loose fence boards that don’t come off but they might rattle or move.
I use one fastener per picket because I use screws that don’t fail, and because then the wood is free to expand and contract without apply any force to the screw or itself. It won’t crack either, so water can’t get in to begin the rotting process.
Furniture made from solid wood must be made to account for wood movement. Cabinet doors with floating panels are made that way so that the panels don’t tear the frame apart when they expand and contract. Wood changes size with relative humidity. You can either take that into account as a woodworker or you can make things that slowly tear themselves apart.
The only challenge with using a single fastener is that you must choose an orientation for each fence board such that when it cups, it cups toward the 2x4 lateral to which it is attached.
The image below shows a stack of pickets. You are looking at the end grain. Under the stack is a 2x4. They are oriented how they should be oriented if each one was separately attached to that 2x4. If you turn them upside down in this photo and attach them, they would cup away from the 2x4 over time.
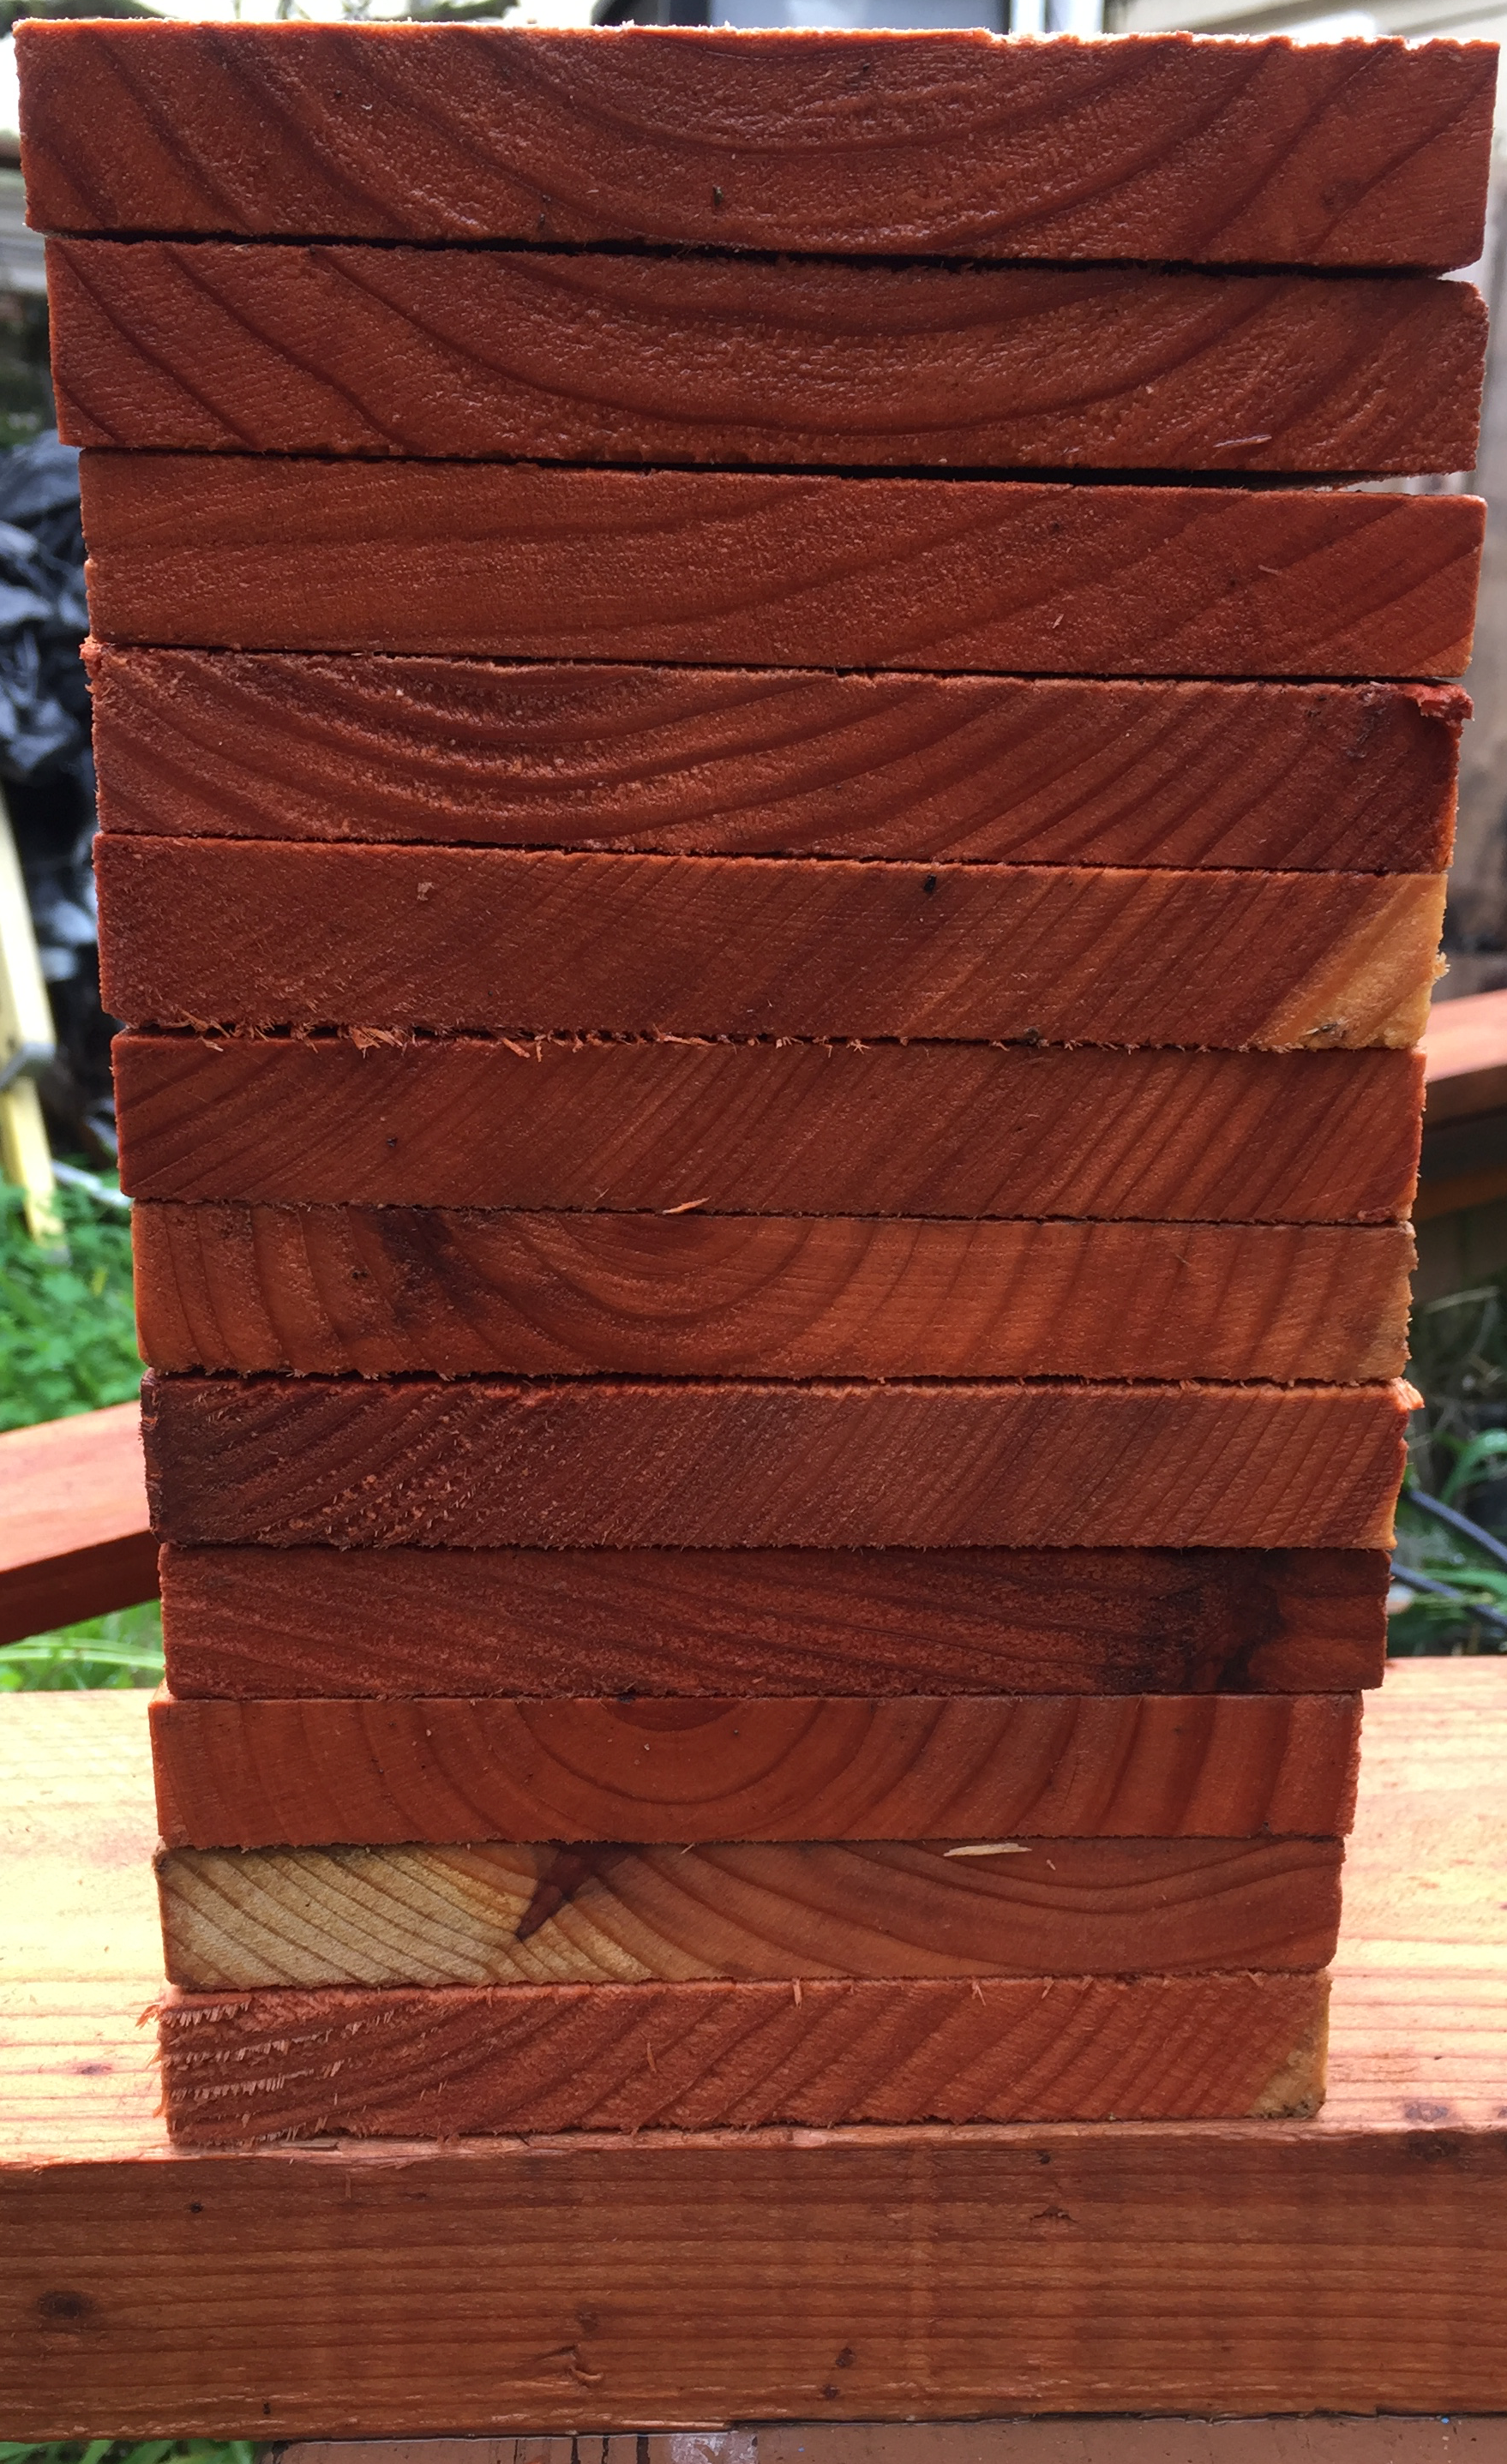
Sometimes it is too close to call, such as if the board is quarter sawn. In a quarter sawn piece the end grain would show vertical lines. It wouldn’t matter which way you attach a quarter sawn board, it probably will not cup much if at all.
If you are making a good neighbor fence it doesn’t matter as much because the wood is retained by the 1x1 strips, which resist the cupping effect somewhat. It may still cup a little, so you might want to orient them in a useful pattern, such as all the same way, or alternating so each adjacent picket cups in opposite directions.
Conclusion
Fences are temporary structures. If you don’t believe me you should see how fast I can take one down with a sawzall. They seem like walls, but they’re just woodworking projects. A maintainable fence is not really much more expensive to create than one that is a lot harder to maintain. If you have the tools and techniques then perhaps all fences are maintainable, but for the average DIY homeowner it makes more sense for fences to be built with screws where possible, and for those screws to be T25 star drive screws and not Phillips head screws. A least cost fence will last longer if each picket has only one screw at the top and one at the bottom (instead of two each at the top and bottom).And whatever you do keep dirt from contacting any part of your fence, especially at the post bases.