Low Carbon Footprint Fences
14/03/21 09:16
One of the goals of my business is to minimize the carbon footprint of my fence projects.
Full disclosure: I drive a big, gasoline fueled cargo van from 2000 because I regularly haul a couple thousand pounds of materials or debris. This is the smallest vehicle that can serve the purpose to which I put it. A smaller vehicle would need to make more trips to transport the same load I can in one trip.
The rest of this blog post is about the fence project itself. These are my “first principles” of reducing the carbon footprint of fences
It is also usually the case that following these first principles also leads to a lower cost project, which is nice.
I’ve already written why concrete is so bad for the planet here. That’s why I try to minimize its use.
Replacing Fence Posts
I often replace posts by reusing the existing post base - I have a good blog post with pictures about how to do that. But, sometimes the post bases have issues, such as:
In the first case the post base simply cannot be reused. It has to be cracked out, at least partially. If it is cracked I remove the cracked parts and leave behind as much of the original post base as possible, unless it is less than half of a post base. If it is less than half I will usually remove it all.
I use fast-setting concrete. I never use “fence post concrete”. The kind I use is quite adhesive and will stick to the concrete already in the hole. It still needs to be 2” thick or thicker at its thinnest points, which are near the corners of the post. If the original post base isn’t at least 2” thick at the corners of the post it probably won’t survive the process of driving in a new post even if you are able to clear it.
But, in my experience a post base can usually be cleared and reused. I’d say more than 75% of the post bases I deal with are more or less easily reused.
Building a Vertical Fence on Leaning Posts
Recently I repaired and rebuilt two different fences where the post bases had rolled. I replaced the posts but they weren’t in any kind of line and they weren’t vertical. I certainly could have built a fence that wasn’t vertical nor straight but there is a better approach that yields a perfectly vertical fence regardless of the position of the posts. It requires a little more wood and woodworking.
Almost regardless of the fence design, the end result will have to include posts that are in line and vertical. But, only one side of the post needs that. The other sides of the post do not need to be vertical nor in a line.
I add wood to one side of the posts that aren’t plumb and in line. Post bases tend to roll so the angled post would point away from the fence. They can also roll along the fence line, but is much less of a problem because you can just use shorter or longer laterals to compensate for that. The hardest problem is the one that comes up most often: correcting for a post that leans away from the fence.
Typically I add a wedge of wood, but you can also add a wider piece of wood, such as a 2x8. But, redwood 2x8s are expensive and I can cut a 2x4 into two wedges that will work just as well as attaching a more expensive 2x8 to the side.
To check the alignment of the posts I attach a string to both end posts. Typically the posts all lean in the same direction but they might not. I have had fences with snaggletooth posts in all directions that could only be addressed by adding 2x12s to each post. It all starts by finding a straight line that none of the posts cross and building the rest of them out to that line.
To extend a post to the new fence line (defined by the string, which remains during this whole process) I add wedges and shims made from redwood 2x4s. I like using the rough 2x4s instead of the smooth S4S 2x4s because they are slightly thicker and wider.
I add the wedges first and then add shims as needed to reach the fence line.
For the thicker section you can pre-drill a 3/8” hole 1” deep into the wedge and then insert a 3.5” screw into that 1” hole. It grabs the 2x4 at a point 1” below the surface, capturing 2.5” of the 2x4. You’ll need a longer bit to drive the screw at the bottom of the hole. There are longer screws, but they cost more and capturing 2.5” is enough.
I only ever use T25 star drive screws. I never use Philips head screws or square drive screws; however, I do swear at them and direct my ire toward them when I am forced to remove them.
Once the wedges are on then the rest of the gap from that point to the fence line needs to be occupied by solid wood. I prefer to use the rough 2x4s, but resting across the two wedges. That allows me to add 1.5” at a time. If it is going to need more than one 2x4 I will sometimes add a 4x4 instead. If I do, I drill 3/8” holes 1” deep and insert 3.5” screws in them to secure the 4x4 to each of the wedges behind it.
If I need 3/4” I will use a fence board to fill the gap, but only a really solid red one (construction heart).
If I need other thicknesses I will sometimes rip them from 2x4s on a tablesaw. That makes strips as wide as a 2x4 and the correct thickness for your needs. I attach those last, on top of any other shims and on top of all of the wedges. When you finally attach a fence board there be sure to use longer screws than usual so that the fasteners go through these thinner, custom shims.
It takes about half an hour to add wood to a post to make it have a vertical front. No new post base is needed. A new fence or a rebuilt fence made on the new combination post will be as vertical as the side you prepared with wedges and shims.
Minimizing Waste
There are lots of advantages to minimizing waste. First, there is less to throw away at the dump or in your trash. That is a good thing by itself because it saves you time and probably money if you have a nontrivial amount of waste.
Some waste can’t be avoided, such as rotted or broken wood. But other waste is tied to what you buy and how you use it. I have the luxury of using leftover wood on my next project and that is one way I reduce waste. Another way is in my choice of lengths. If I am building a fence with 6’ sections I buy 2x4x12s. If they are 7’ or 8’ sections I buy 2x4x8s. My goal is less than 10% waste in what I buy. When I do a good job there are only end-cuts left and it doesn’t take long to clean up.
Another aspect to minimizing waste is not assuming the existing fence is all waste. Often the fence boards can be reused with 20+ years of life in them. If you can push a finger into them they are too deteriorated to be used. The laterals may be rotted, but you can put new ones in place and attach all the fence boards and posts to the new 2x4s before removing the old ones by cutting the nails with a sawmill.
I always build with screws because then it is simple to remove and replace fence boards. If you needed to maintain such a fence years from now it would be easy to disassemble it and rebuild it after replacing whatever wood needed to be replaced. You can’t do that with nails. Nails are one-time-only fasteners. Screws minimize waste by enabling non-destructive maintenance. Nails increase future waste by ensuring that maintenance requires extra time and materials and cost. Wasted money is still waste.
Another opportunity to minimize waste occurs when there are chunks of concrete left over, such as when a post base was cracked and some or all of it needed to be replaced. The chunks left over can either be taken to the dump or used somehow on the property. I try to suggest creative ways people can use this “urban crete” in their yards.
Of course it can also be disposed of. It costs $29 for 500 pounds at the Berkeley Transfer Station - just slightly more than it costs to buy regular concrete (not the kind I use). If I do it for a client it is probably an hour of labor plus the dump fees - so a bit over $100. You cannot load your municipal garbage bin with concrete - there is a weight limit for them that is quickly reached when you add concrete.
The problem with disposal is moving it. It is heavy. When I dump it at the Berkeley Transfer Station it gets pushed around all day and shipped away at night. Even if it gets recycled it took a lot of fuel to get it to a point where it could be recycled. By then the carbon footprint has increased beyond whatever could have been recovered through recycling.
Reuse on-site is the best possible outcome, but hopefully not via adding yet more concrete. The goal is to minimize not only the use of concrete, but also to minimize the transportation of heavy materials. Any concrete I buy or throw away was transported multiple times, producing carbon dioxide in the atmosphere for every mile.
Redwood is Carbon Negative
One of the poetic bright spots of building fences from redwood is that California, FSC-certified redwood itself is a carbon negative product. Practically all of the carbon in wood comes from the atmosphere. The plant takes in CO2 and splits it up into carbon and O2. It lets the O2 go and we like to breath that stuff. It uses the carbon to make more wood. It gets all kinds of nutrients via its plant system, but it doesn’t get much carbon that way compared to how much it gets directly from the atmosphere via photosynthesis.
Wood is at about 50% carbon by weight, so 100 pounds of wood is 50 pounds. CO2 is about 27% carbon by weight. The oxygen in it weighs almost 73% by comparison. So, 50 pounds of carbon represents 185 pounds of CO2. Right off the bat wood takes more weight of CO2 out of the air than it actually weighs in your hands. That’s kinda cool at a tangible, human scale.
But, it takes fuel or energy of some kind to develop and utilize trees to make and distribute lumber. While it grows without our energy, it needs fuel of some kind and machines to harvest it, transport it out of the forest to a lumber mill. Move it around inside the lumber mill and turn it into lumber. Move that lumber around and ultimately deliver it to locations where it can be purchased by people like me. It probably moves several times, possibly onto and off of a train, ship and/or trucks.
But, even when you consider all of that FSC redwood is still carbon negative. In other words, using it takes CO2 out of the atmosphere just as well as not driving a car or not buying concrete.
The other side of the equation is that redwood is a renewable resource and all aspects of its husbandry, transportation and milling comprise 52,000 jobs in California (13.2 million jobs worldwide). It accounts for about $3.3 billion of annual payroll in California (over $600 billion worldwide).
I only buy FSC-certified wood products. That is my guarantee that they were sustainably harvested and that the foregoing is true. Redwood isn’t cheap like the pine people use to build houses. It costs 3x as much as pine. There is a huge demand for redwood and it is higher priced now than I can ever remember. I doubt the price is going down any time soon because the supply doesn’t expand very quickly. But, by buying only certified wood I support the growers who are good stewards of the land.
The story doesn’t end there though. If the wood has not been painted then it can be composted. Composting the wood at the end of life adds a super-bonus to the carbon footprint instead of causing a problem longer off in the future.
If wood ends up in a landfill, it is going to be converted into methane over time. If that escapes into the atmosphere (which we should assume it will) then it will be 30x worse than the comparable amount of CO2. If the wood ends up in a landfill then it didn’t really have a negative carbon footprint once it finally decomposes. Of course that could be a hundred years or more in the future because materials in landfills tend to decompose very slowly.
But, if the wood is composted then it becomes soil that hosts a wide variety of creatures, plants and fungi. All of the carbon in those creatures comes from what they eat, which begins with the wood but quickly evolves into eating each other. The carbon for bugs doesn’t come from the atmosphere because they breathe oxygen. The plants get their carbon from the atmosphere, but fungi get it by eating things. And, both bugs and fungi eat the plants, which draws carbon from the atmosphere into the bugs and fungi as they grow.
If the compost is used to provide new ground soil or to amend problematic ground soil it will continue to support new organisms, capturing additional carbon from the atmosphere over time.
I see a lot of old fences. Many have unpainted fence boards more than 50 years old that are still serviceable. Pets can’t get through and they offer some privacy. If one does paint a fence it doesn’t help that much. The paint will crack because of natural expansion and contraction in the wood and water will carry the same bacteria and fungi into contact with the wood that would have been there, except that now there is a crack they can hide in while trying to consume the wood. Thats why you see blackened cracks in white painted fences. Ultimately the wood inside will rot about a little slower than if it wasn’t painted.
But, you’d have to keep painting it every few years. Paint isn’t cheap and it takes time and effort to paint a fence. Over the life of the fence you’d be paying for it many times in the cost of paint and effort to keep it painted. And the carbon footprint of paint isn’t great, because pigments come from minerals which must be mined and from petroleum products which are obviously carbon positive.
So, an unpainted FSC redwood fence, reusing existing concrete post bases has the the very lowest carbon footprint. If minimizing cost is also important wood can be reused if it is still serviceable (usually just the fence boards can be reused). But, even if aesthetics trump cost among priorities an all-new wooden fence can still be built reusing existing post bases. More wood actually equals an even lower carbon footprint.
Why Not Pressure Treated Wood?
I don’t use pressure treated wood except for retaining walls. And, I don’t build retaining walls over 11.5” tall (a 2x12). Taller than that probably requires a retaining wall designed by an engineer.
Pressure treated wood is made from hem fir or other white wood that has no natural protection from insects, bacteria nor fungus. It is essentially candy to these creatures. Once they get a foothold it is only a matter of time until all the wood is consumed.
The wood is coated with a wood preservative that also stains the wood. The coating used to contain arsenic, but since the end of 2003 it has contained a copper compound instead, plus an insecticide called Azol. The wood is placed in a pressure vessel to drive the compound deeper into the wood. The surface of the wood has characteristic lines pressed into it to provide more surface area through which the compound can soak into the wood.
As long as nothing breaches the coating the white, untreated wood inside is safe. But, wood cracks over time. Sometimes people put in a nail and take it back out. Or a took gouges the surface exposing untreated fibers underneath. Possibilities like these and others mean that the wood is like a balloon, waiting to be popped. One any breach occurs in the surface the game is up and the wood will rot from within. I’ve grabbed onto pressure treated wood only to have it collapse into a handful of treated outer fibers.
I don’t use pressure treated wood for posts nor for laterals because it has a bunch of problems:
Do you really need more reasons?
Ok, sure:
The Bottom Line
The bottom line counts. The final cost of the project matters. It matters to my clients and it matters to me. I am always trying to minimize costs without sacrificing the result. Many people buy based on cost and they already have to get their heads around how I don’t make bids, only estimates. But, that too is about charging people the lowest possible cost that is also fair to everyone. Too often in life the alternatives we face are either green or inexpensive. It is really refreshing when a green choice is also the less expensive choice. It’s doubly nice when the products we use give people good, sustainable jobs.
Fences last a long time, but most houses have a lot of fencing. It’s ubiquitous. There are a lot of post bases out there… In any neighborhood some fence within a few hundred yards needs repairs or replacement. It’s a need almost every homeowner faces sooner or later. It’d be great for that to all be carbon negative.
Full disclosure: I drive a big, gasoline fueled cargo van from 2000 because I regularly haul a couple thousand pounds of materials or debris. This is the smallest vehicle that can serve the purpose to which I put it. A smaller vehicle would need to make more trips to transport the same load I can in one trip.
The rest of this blog post is about the fence project itself. These are my “first principles” of reducing the carbon footprint of fences
- Do nothing at all if the fence doesn’t need to be replaced or repaired
- Minimize the use of new concrete by reusing existing post bases
- Maximize the life of existing wood by reusing fence boards and laterals (2x4s)
- Minimize waste by buying the right size of lumber, composting unpainted wood and reusing urban crete (chunks of solid concrete).
- Minimize transportation of heavy materials
It is also usually the case that following these first principles also leads to a lower cost project, which is nice.
I’ve already written why concrete is so bad for the planet here. That’s why I try to minimize its use.
Replacing Fence Posts
I often replace posts by reusing the existing post base - I have a good blog post with pictures about how to do that. But, sometimes the post bases have issues, such as:
- The post base might be cracked, deteriorated, too thin or simply missing
- The post base may have rolled so the post it would hold wouldn’t be vertical
In the first case the post base simply cannot be reused. It has to be cracked out, at least partially. If it is cracked I remove the cracked parts and leave behind as much of the original post base as possible, unless it is less than half of a post base. If it is less than half I will usually remove it all.
I use fast-setting concrete. I never use “fence post concrete”. The kind I use is quite adhesive and will stick to the concrete already in the hole. It still needs to be 2” thick or thicker at its thinnest points, which are near the corners of the post. If the original post base isn’t at least 2” thick at the corners of the post it probably won’t survive the process of driving in a new post even if you are able to clear it.
But, in my experience a post base can usually be cleared and reused. I’d say more than 75% of the post bases I deal with are more or less easily reused.
Building a Vertical Fence on Leaning Posts
Recently I repaired and rebuilt two different fences where the post bases had rolled. I replaced the posts but they weren’t in any kind of line and they weren’t vertical. I certainly could have built a fence that wasn’t vertical nor straight but there is a better approach that yields a perfectly vertical fence regardless of the position of the posts. It requires a little more wood and woodworking.
Almost regardless of the fence design, the end result will have to include posts that are in line and vertical. But, only one side of the post needs that. The other sides of the post do not need to be vertical nor in a line.
I add wood to one side of the posts that aren’t plumb and in line. Post bases tend to roll so the angled post would point away from the fence. They can also roll along the fence line, but is much less of a problem because you can just use shorter or longer laterals to compensate for that. The hardest problem is the one that comes up most often: correcting for a post that leans away from the fence.
Typically I add a wedge of wood, but you can also add a wider piece of wood, such as a 2x8. But, redwood 2x8s are expensive and I can cut a 2x4 into two wedges that will work just as well as attaching a more expensive 2x8 to the side.
To check the alignment of the posts I attach a string to both end posts. Typically the posts all lean in the same direction but they might not. I have had fences with snaggletooth posts in all directions that could only be addressed by adding 2x12s to each post. It all starts by finding a straight line that none of the posts cross and building the rest of them out to that line.
To extend a post to the new fence line (defined by the string, which remains during this whole process) I add wedges and shims made from redwood 2x4s. I like using the rough 2x4s instead of the smooth S4S 2x4s because they are slightly thicker and wider.
I add the wedges first and then add shims as needed to reach the fence line.
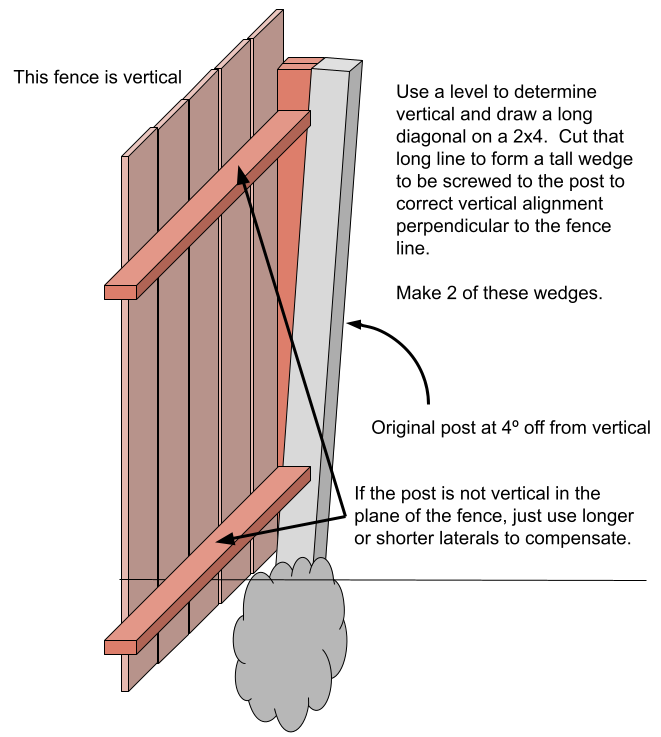
 | | To make the wedges I start by clamping a 2x4 to the leaning post and using a level to draw a vertical line on it. I don’t care whether the 2x4 is vertical in the plane of the fence (toward or away from adjacent posts), only whether it is vertical perpendicular to the fence line (where it leans away from the fence line). If the 2x4 doesn’t reach the fence line at the top because the post is leaning too far, you might need to add a second wedge. You make that one the same way, but it will be much shorter. Whatever wedge you make out of a 2x4, you’ll need two of that shape, side-by-side to act like a 4x4. I use 3” screws through from both sides of the pair to hold them together. To attach the wedges I use a variety of screw sizes. I want at least 1” of threads inside the 4x4 behind each section of wedge. I commonly use up to 3.5” screws which means I can screw a wedge as wide as 2.5”. But, the top of the wedge might be a full 3.5” wide and a longer screw won’t work as-is. |
I only ever use T25 star drive screws. I never use Philips head screws or square drive screws; however, I do swear at them and direct my ire toward them when I am forced to remove them.
Once the wedges are on then the rest of the gap from that point to the fence line needs to be occupied by solid wood. I prefer to use the rough 2x4s, but resting across the two wedges. That allows me to add 1.5” at a time. If it is going to need more than one 2x4 I will sometimes add a 4x4 instead. If I do, I drill 3/8” holes 1” deep and insert 3.5” screws in them to secure the 4x4 to each of the wedges behind it.
If I need 3/4” I will use a fence board to fill the gap, but only a really solid red one (construction heart).
If I need other thicknesses I will sometimes rip them from 2x4s on a tablesaw. That makes strips as wide as a 2x4 and the correct thickness for your needs. I attach those last, on top of any other shims and on top of all of the wedges. When you finally attach a fence board there be sure to use longer screws than usual so that the fasteners go through these thinner, custom shims.
It takes about half an hour to add wood to a post to make it have a vertical front. No new post base is needed. A new fence or a rebuilt fence made on the new combination post will be as vertical as the side you prepared with wedges and shims.
Minimizing Waste
There are lots of advantages to minimizing waste. First, there is less to throw away at the dump or in your trash. That is a good thing by itself because it saves you time and probably money if you have a nontrivial amount of waste.
Some waste can’t be avoided, such as rotted or broken wood. But other waste is tied to what you buy and how you use it. I have the luxury of using leftover wood on my next project and that is one way I reduce waste. Another way is in my choice of lengths. If I am building a fence with 6’ sections I buy 2x4x12s. If they are 7’ or 8’ sections I buy 2x4x8s. My goal is less than 10% waste in what I buy. When I do a good job there are only end-cuts left and it doesn’t take long to clean up.
Another aspect to minimizing waste is not assuming the existing fence is all waste. Often the fence boards can be reused with 20+ years of life in them. If you can push a finger into them they are too deteriorated to be used. The laterals may be rotted, but you can put new ones in place and attach all the fence boards and posts to the new 2x4s before removing the old ones by cutting the nails with a sawmill.
I always build with screws because then it is simple to remove and replace fence boards. If you needed to maintain such a fence years from now it would be easy to disassemble it and rebuild it after replacing whatever wood needed to be replaced. You can’t do that with nails. Nails are one-time-only fasteners. Screws minimize waste by enabling non-destructive maintenance. Nails increase future waste by ensuring that maintenance requires extra time and materials and cost. Wasted money is still waste.
Another opportunity to minimize waste occurs when there are chunks of concrete left over, such as when a post base was cracked and some or all of it needed to be replaced. The chunks left over can either be taken to the dump or used somehow on the property. I try to suggest creative ways people can use this “urban crete” in their yards.
- You can use urban leftover concrete chunks for a variety of purposes:
- You can add a border to an area to create a terrace with a line of concrete chunks
- You can stabilize an existing slope edge
- You can pile it in circles around trees and plants
- You can stack it in areas where dogs dig to discourage them from digging
- You can bury it
- You can break it into smaller pieces that suit your needs or disappear into soil more easily
Of course it can also be disposed of. It costs $29 for 500 pounds at the Berkeley Transfer Station - just slightly more than it costs to buy regular concrete (not the kind I use). If I do it for a client it is probably an hour of labor plus the dump fees - so a bit over $100. You cannot load your municipal garbage bin with concrete - there is a weight limit for them that is quickly reached when you add concrete.
The problem with disposal is moving it. It is heavy. When I dump it at the Berkeley Transfer Station it gets pushed around all day and shipped away at night. Even if it gets recycled it took a lot of fuel to get it to a point where it could be recycled. By then the carbon footprint has increased beyond whatever could have been recovered through recycling.
Reuse on-site is the best possible outcome, but hopefully not via adding yet more concrete. The goal is to minimize not only the use of concrete, but also to minimize the transportation of heavy materials. Any concrete I buy or throw away was transported multiple times, producing carbon dioxide in the atmosphere for every mile.
Redwood is Carbon Negative
One of the poetic bright spots of building fences from redwood is that California, FSC-certified redwood itself is a carbon negative product. Practically all of the carbon in wood comes from the atmosphere. The plant takes in CO2 and splits it up into carbon and O2. It lets the O2 go and we like to breath that stuff. It uses the carbon to make more wood. It gets all kinds of nutrients via its plant system, but it doesn’t get much carbon that way compared to how much it gets directly from the atmosphere via photosynthesis.
Wood is at about 50% carbon by weight, so 100 pounds of wood is 50 pounds. CO2 is about 27% carbon by weight. The oxygen in it weighs almost 73% by comparison. So, 50 pounds of carbon represents 185 pounds of CO2. Right off the bat wood takes more weight of CO2 out of the air than it actually weighs in your hands. That’s kinda cool at a tangible, human scale.
But, it takes fuel or energy of some kind to develop and utilize trees to make and distribute lumber. While it grows without our energy, it needs fuel of some kind and machines to harvest it, transport it out of the forest to a lumber mill. Move it around inside the lumber mill and turn it into lumber. Move that lumber around and ultimately deliver it to locations where it can be purchased by people like me. It probably moves several times, possibly onto and off of a train, ship and/or trucks.
But, even when you consider all of that FSC redwood is still carbon negative. In other words, using it takes CO2 out of the atmosphere just as well as not driving a car or not buying concrete.
The other side of the equation is that redwood is a renewable resource and all aspects of its husbandry, transportation and milling comprise 52,000 jobs in California (13.2 million jobs worldwide). It accounts for about $3.3 billion of annual payroll in California (over $600 billion worldwide).
I only buy FSC-certified wood products. That is my guarantee that they were sustainably harvested and that the foregoing is true. Redwood isn’t cheap like the pine people use to build houses. It costs 3x as much as pine. There is a huge demand for redwood and it is higher priced now than I can ever remember. I doubt the price is going down any time soon because the supply doesn’t expand very quickly. But, by buying only certified wood I support the growers who are good stewards of the land.
The story doesn’t end there though. If the wood has not been painted then it can be composted. Composting the wood at the end of life adds a super-bonus to the carbon footprint instead of causing a problem longer off in the future.
If wood ends up in a landfill, it is going to be converted into methane over time. If that escapes into the atmosphere (which we should assume it will) then it will be 30x worse than the comparable amount of CO2. If the wood ends up in a landfill then it didn’t really have a negative carbon footprint once it finally decomposes. Of course that could be a hundred years or more in the future because materials in landfills tend to decompose very slowly.
But, if the wood is composted then it becomes soil that hosts a wide variety of creatures, plants and fungi. All of the carbon in those creatures comes from what they eat, which begins with the wood but quickly evolves into eating each other. The carbon for bugs doesn’t come from the atmosphere because they breathe oxygen. The plants get their carbon from the atmosphere, but fungi get it by eating things. And, both bugs and fungi eat the plants, which draws carbon from the atmosphere into the bugs and fungi as they grow.
If the compost is used to provide new ground soil or to amend problematic ground soil it will continue to support new organisms, capturing additional carbon from the atmosphere over time.
I see a lot of old fences. Many have unpainted fence boards more than 50 years old that are still serviceable. Pets can’t get through and they offer some privacy. If one does paint a fence it doesn’t help that much. The paint will crack because of natural expansion and contraction in the wood and water will carry the same bacteria and fungi into contact with the wood that would have been there, except that now there is a crack they can hide in while trying to consume the wood. Thats why you see blackened cracks in white painted fences. Ultimately the wood inside will rot about a little slower than if it wasn’t painted.
But, you’d have to keep painting it every few years. Paint isn’t cheap and it takes time and effort to paint a fence. Over the life of the fence you’d be paying for it many times in the cost of paint and effort to keep it painted. And the carbon footprint of paint isn’t great, because pigments come from minerals which must be mined and from petroleum products which are obviously carbon positive.
So, an unpainted FSC redwood fence, reusing existing concrete post bases has the the very lowest carbon footprint. If minimizing cost is also important wood can be reused if it is still serviceable (usually just the fence boards can be reused). But, even if aesthetics trump cost among priorities an all-new wooden fence can still be built reusing existing post bases. More wood actually equals an even lower carbon footprint.
Why Not Pressure Treated Wood?
I don’t use pressure treated wood except for retaining walls. And, I don’t build retaining walls over 11.5” tall (a 2x12). Taller than that probably requires a retaining wall designed by an engineer.
Pressure treated wood is made from hem fir or other white wood that has no natural protection from insects, bacteria nor fungus. It is essentially candy to these creatures. Once they get a foothold it is only a matter of time until all the wood is consumed.
The wood is coated with a wood preservative that also stains the wood. The coating used to contain arsenic, but since the end of 2003 it has contained a copper compound instead, plus an insecticide called Azol. The wood is placed in a pressure vessel to drive the compound deeper into the wood. The surface of the wood has characteristic lines pressed into it to provide more surface area through which the compound can soak into the wood.
As long as nothing breaches the coating the white, untreated wood inside is safe. But, wood cracks over time. Sometimes people put in a nail and take it back out. Or a took gouges the surface exposing untreated fibers underneath. Possibilities like these and others mean that the wood is like a balloon, waiting to be popped. One any breach occurs in the surface the game is up and the wood will rot from within. I’ve grabbed onto pressure treated wood only to have it collapse into a handful of treated outer fibers.
I don’t use pressure treated wood for posts nor for laterals because it has a bunch of problems:
- It twists and bends terribly
- Every time you cut it the cut end must be treated with wood preservative otherwise it will begin to rot right away
- It stains other wood, clothing and skin with toxic chemicals
Do you really need more reasons?
Ok, sure:
- It cannot be taken to the dump in California because it is classified as toxic waste - none of your off-cuts can be put in your municipal garbage either.
- If you put it in the sun the top will shrink and the bottom won’t and it will warp - same if you use it as a top rail on a fence
- You cannot reliably correct warping once it happens
- Pressure treated 4x4s are often made from tree cores, left over from when the tree was shaved to make thin sheets for plywood. The core is the least stable part of the tree.
The Bottom Line
The bottom line counts. The final cost of the project matters. It matters to my clients and it matters to me. I am always trying to minimize costs without sacrificing the result. Many people buy based on cost and they already have to get their heads around how I don’t make bids, only estimates. But, that too is about charging people the lowest possible cost that is also fair to everyone. Too often in life the alternatives we face are either green or inexpensive. It is really refreshing when a green choice is also the less expensive choice. It’s doubly nice when the products we use give people good, sustainable jobs.
Fences last a long time, but most houses have a lot of fencing. It’s ubiquitous. There are a lot of post bases out there… In any neighborhood some fence within a few hundred yards needs repairs or replacement. It’s a need almost every homeowner faces sooner or later. It’d be great for that to all be carbon negative.